Create a newsletter site for free in 30 minutes

Jul 01 2024
James Dawson
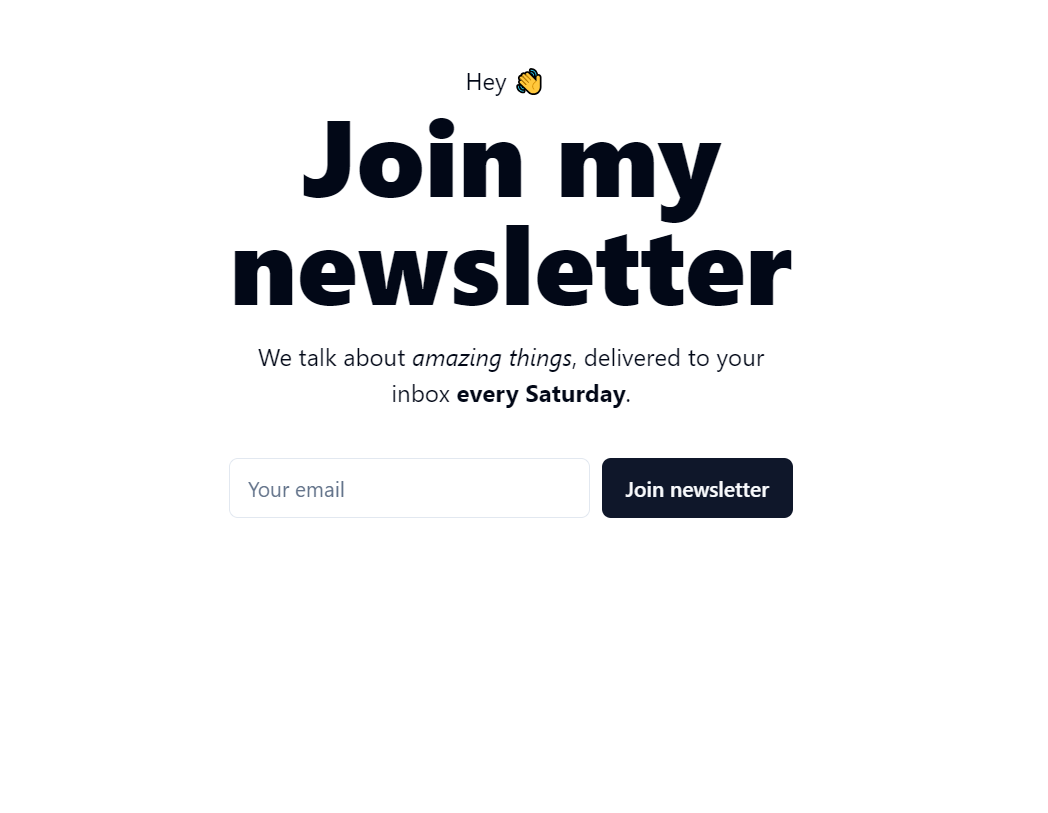
By the end of this article you should have something that looks like this and is a fully functioning newsletter for free!

Initial Setup
We need to create a new project.
pnpm dlx nuxi@latest init <project-name>
We will also add typescript.
pnpm add -D typescript
and finally we will add tailwind.
pnpm dlx nuxi@latest module add @nuxtjs/tailwindcss
We now want to add the shadcn nuxt module.
pnpm dlx nuxi@latest module add shadcn-nuxt
Then we open our nuxt.config.ts file. And replace it with the following.
export default defineNuxtConfig({
  modules: ["@nuxtjs/tailwindcss", "shadcn-nuxt"],
  shadcn: {
    /**
     * Prefix for all the imported component
     */
    prefix: "",
    /**
     * Directory that the component lives in.
     * @default "./components/ui"
     */
    componentDir: "./components/ui",
  },
});
Run the setup CLI.
pnpm dlx shadcn-vue@latest init
And finally just follow the default steps. Make sure you select your framework as Nuxt
Would you like to use TypeScript (recommended)?  yes
Which framework are you using? Nuxt
Which style would you like to use? › Default
Which color would you like to use as base color? › Slate
Where is your tsconfig.json or jsconfig.json file? › ./tsconfig.json
Where is your global CSS file? › › src/index.css
Do you want to use CSS variables for colors? › no / yes
Where is your tailwind.config.js located? › tailwind.config.js
Configure the import alias for components: › @/components
Configure the import alias for utils: › @/lib/utils
Write configuration to components.json. Proceed? > Y/n
That is all the setup done! All we need to do now is add the input and button components.
pnpm dlx npx shadcn-vue@latest add button input
Build a basic app
Amazing, now let’s make ourselves a quick landing page. Replace the following code in your app.vue file.
<template>
  <div class="dark space-x-2 max-w-sm mx-auto my-auto mt-20">
    <p class="text-center">Hey 👋</p>
    <h1 class="text-7xl font-extrabold text-center mb-4">Join my newsletter</h1>
    <p class="text-center mb-8">We talk about <i>amazing things</i>, delivered to your inbox <b>every Saturday</b>.</p>
    <div class="flex gap-2 ">


    <Input type="email" placeholder="Your email" />
    <Button>Join newsletter</Button>
    </div>
 </div>
</template>
This should all do the job! We now need an endpoint to send the signup request to, along with the users actual email address.
Backend with Resend
Now we can implement Resends logic. First we need create an account with Resend and get your API key.
Once you have your API key. You should create a .env file at the root of your directory and add the API key here.
RESEND_API_KEY=you_key_goes_here
Now we need to create an endpoint that will handle adding the email address to our resend audience and sending them a thankyou email.
Create a new file in server/api/newsletter.post.ts and add the following code.
import { Resend } from "resend";

export default defineEventHandler(async (event: any) => {
  const resend = new Resend(process.env.RESNED_API_KEY);
  const { email } = await readBody(event);

  try {
    const { error } = await resend.contacts.create({
      email,
      unsubscribed: false,
      audienceId: YOUR_AUDIENCE_ID,
    });

    if (error) {
      return {
        statusCode: 400,
        body: error.message,
      };
    }

    await resend.emails.send({
      from: "onboarding@resend.dev",
      to: email,
      subject: "Hello",
      html: "<p>Thank you for joining my newsletter</p>",
    });

    return {
      statusCode: 200,
      body: "You have been added to the newsletter",
    };
  } catch (err) {
    return {
      statusCode: 500,
      body: "Internal Server Error",
    };
  }
});
Finally all that is left to do is to hook the frontend up to this api call
const handleSubmitNewsletter = async (email: string) => {
  const response = await $fetch("/api/newsletter", {
    method: "POST",
    body: { email },
  });

  if (response.statusCode === 200) {
    toast(response.body);
  } else {
    toast("Error", {
      description: response.body || "An error occurred",
    });
  }
};
Now just add this function to your current frontend
<script lang="ts" setup>
const email = ref<string | null>(null);
const handleSubmitNewsletter = async (email: string) => {
  const response = await $fetch("/api/newsletter", {
    method: "POST",
    body: { email },
  });

  if (response.statusCode === 200) {
    toast(response.body);
  } else {
    toast("Error", {
      description: response.body || "An error occurred",
    });
  }
};
</script>

<template>
  <div class="space-x-2 max-w-md mx-auto my-auto mt-20 border border-border px-6 py-12  rounded-lg">
    <p class="pl-2">Hey 👋</p>
    <h1 class="text-3xl font-extrabold  mb-2">Join my newsletter!</h1>
    <p class=" mb-16">We talk about <i>amazing things</i>, delivered to your inbox <b>every Saturday</b>.</p>
    <div class="flex gap-2 ">


    <Input type="email" placeholder="Your email" v-model="email"/>
    <Button @click="handleSubmitNewsletter(email)">Join newsletter</Button>
    </div>
 </div>
</template>
And we have a working newsletter!
Become a better builder
Join our newsletter for frontend tip and tricks.
New blog posts every Sunday.
